Search This Blog

Friday, May 9, 2014

Happy Mother's Day

Motherhood an Eternal Partnership with God: http://youtu.be/-5O9m121m9I

Wednesday, April 23, 2014

Tasty and Healthy Scrambled Eggs

I have been trying several different ingredients in our scrambled eggs.  We like to eat them for dinner and want to make them a little more satisfying and tasty.  I have added Hebrew Nationals hot dogs and that was good.  I have added mixed veggies, cheese, bacon, ham, bacon spam, potatoes, avocado and several other things here and there.  They were all pretty good, but my favorite has been this last batch we had for Easter dinner.  It was just Duane and I, so we did not do a big traditional Easter dinner.  We wanted to try cauliflower as a substitute for potatoes.  I have made cauliflower before and Duane loved it, so I added it to the eggs, bacon and avocado and it was awesome!  I know, you would not think cauliflower would make a good substitute for potatoes, coming from the girl who was born and raised in Idaho, but it was really good.


This is not your ordinary cauliflower, it is seasoned and baked, so good.  Preheat oven to 375 degrees.   Add about a tsp. of each, garlic powder, onion powder and ground cumin, 1/2 tsp. of celery salt and sea salt, and a couple of dashes of paprika to a large plastic baggie.  I used a gallon ziplock bag.  Shake them up a bit and then add about 1/3 to 1/2 cup olive oil.  Mix it up by sloshing it around a little bit in the bag.  Add the cauliflower, about 1/2 a head cut into 1 inch pieces or a 16 oz. bag of thawed cauliflower.  I used frozen cauliflower, thawed.  Shake it up and squish it around, this is the fun part. Once the cauliflower is coated with seasoning mixture, dump it out onto a cookie sheet with edges, lined with parchment paper.  I used my stone and it worked fine, you just have to make sure that it has a little bit of an edge, so the oil does not drip into your oven while cooking.  Bake for 20-25 minutes or until a golden crispy brown.

While cauliflower is baking, cook or heat up your bacon chunks or crumbles, about 1/2 cup.  Cut up 1 avocado into small chunks and scramble 8-12 eggs in a large frying pan.  Once the cauliflower is done, add all ingredients together and mix well.  Serve hot and enjoy!  The seasoning from the cauliflower mixes with the eggs and the bacon flavor is so yummy.  The avocado mixes in nicely and has a light flavor to it, so you hardly notice it, but it is packed with goodness.  All of the ingredients are tasty and most of them are good for you.  Just look at my hubby, Duane, enjoying the deliciousness.  I think my boys would even like it, if I could get them to try it.  Silly kids!

I know, he does not look enthused, but this is his, "I am concentrating on eating and enjoying this" look.

Healthier Corn Chowder with Butternut Squash and Bacon

After making the corn chowder I posted earlier, I found out there was some hidden sugars in it.  So I came up with a little bit better recipe that I like even more.  Apparently cream corn and ham have sugar in them.  Most things have sugar in them, you can miss them if you are not looking for the right things.  The recipe is not free of sugar completely, but has less than before, a scant amount that should not be a problem, when it comes to weight loss.


1 carton of Organic Chicken Stock (Kirkland's brand from Costco)
1 butternut squash, peeled and seeded, cut into small chunks (1-2 inches)
1 large yellow onion, minced or diced
1 Tbsp of minced garlic, fresh or from the jar (fresh is best)
2-15 oz. cans of corn, blended in your blender (I used my Magic Bullet.)
2-15 oz. cans of corn, left whole, you can use frozen corn too (I did not have any on hand.)
   (The corn I used is also Kirkland brand, it has no added sugar.)
1-8 oz. package of cream cheese, cut up into chunks
   (check your labels, some cream fat free cream cheeses have corn syrup)
1 cup of bacon crumbles (I used the fully cooked kind, but you have to watch them, some have sugar in the   curing process)

Put everything in the crock pot and cook on low for 8 hours. Stir and smash the squash with a potato smasher.  Serve hot and enjoy!  Add salt and pepper to taste.

Sunday, April 13, 2014

Saturday, March 22, 2014

Red Cross App

I'm safe http://3cu.be/tis via the American Red Cross Tornado app

Thursday, March 20, 2014

Mini Chocolate Chip Pancake Bites

Here is my little yummy creation for the day.
I made some pancake bites with mini chocolate chips in them.  Only 6 ingredients, Krusteaz pancake mix, milk, eggs, avocado oil, mini chocolate chips and sugar in the raw.  You know me, I didn't measure, so these are estimates.
Add 4 cups pancake mix, 4 eggs, 3/4 cup milk and 1/3 cup oil to a mixing bowl. (You could use water instead of milk and any cooking oil will work.)  Mix until the chunks are broken up, but not gone.  You want it to be a little thicker than pancake batter, about as thick as muffins. Then add one bag of mini chocolate chips and stir.  Try not to over mix them, they will get kind of tough if you do.  Spoon into a well greased mini muffin pan, I used buttery baking spray and my small ice cream scoop.  Sprinkle some sugar in the raw or sugar crystals on the tops of each one, for an added little bit of sweetness.  Bake at 350 degrees for 8-10 minutes on the second from the top rack of you oven.  You could use a cupcake pan, just increase your bake time to about 15 minutes or so and lower the rack to the middle of the oven.
I think these are yummy and make for a quick breakfast or snack.  Happy Baking!!

Wednesday, March 5, 2014

Pumpkin Applesauce Corn Flour Cookies


Pumpkin, applesauce, corn flour cookies?  I know, it doesn't sound very appetizing, but if you could smell these surprisingly tasty treats, you would be in heaven.  I was having some fun experimenting with baking today.  These have ZERO sugar in them!!  Something about the applesauce and pumpkin, mixed with cinnamon and nutmeg, it didn't need any sugar.  I also used coconut oil instead of butter.  But if you are a sugar lover like me and want to add just a little bit of sweetness to your cookie, white chocolate chips are perfect.  I actually stuck some in one of the cookies after it was baked and tried it.  It was almost too sweet, yes, you read that right, too sweet.  You will rarely hear me say that, but on occasion it comes out.


So, how do you make these yummy cookies?


This is what I had and this is what I used.  If you have read my blog at all, you will know that I hate measuring, especially when I am just making something up as I go.  I tried hard to measure this time and keep track of what I put in.

Pumpkin Applesauce Corn Flour Cookies

Preheat oven to 350 degrees.

1 cup corn flour
1/2 cup ground instant tapioca
1 tsp. salt (you could go with less than that and still be ok)
1 tsp. baking soda
1 1/2 Tbsp. cinnamon
1 tsp. nutmeg
1 cup coconut oil solid (3/4 cup melted)
1 can pure pumpkin (not pie filling)
1 cup applesauce
1 large dollop of plain Greek yogurt (about 1/4 cup)
3 eggs at room temperature
3 tsps.  pure vanilla extract

Mix dry ingredients in a bowl and set aside.  You will notice there is not a lot of dry ingredients.  That is because corn flour absorbs moisture quickly and the tapioca ground up will also absorb the liquid and gives it a little better texture than if you only added corn flour.  You need a little something to lighten the corn taste and texture.  You could use tapioca flour, soy flour or even almond flour instead.  They are all more expensive than wheat flour, but if you are on a no gluten or amylose diet, like my husband, a little bit added to a less expensive flour like corn flour works.  I am not sure if corn flour is gluten free, but it has no amylose and is o.k. for Duane to eat.  If gluten is an issue and not sugar or amylose, oatmeal ground into flour works too.  Remember that all these grains have different properties, so you will have to play with them a little bit to see what works well and how much is needed.

Melt or soften the coconut oil in a large glass bowl.  Add the rest of the liquid ingredients and eggs.  The coconut oil may solidify some, just keep mixing it well.  I would make sure all liquid ingredients are at room temperature when adding them to the oil, except the yogurt, add it last.  You can use an electric mixer if you want, I just prefer doing it by hand when experimenting so that I can feel the thickness.


Once the liquid ingredients are mixed well, add the dry ingredients.


It should be similar to chocolate chip cookie dough.  Pasty, but not dry.  You might still see some chunks of coconut oil, try to mix them in a little bit more.


Drop onto cookie sheets lined with parchment paper, about 2 inches apart.  I almost always use parchment paper when baking.  I also like to use an ice cream scoop so that my cookies are uniform in size.  Press them down a little with your finger or a fork to flatten them.  Corn flour is very different from wheat flour.  I found that these cookies did not spread out on their own and were a little doughy if I did not flatten them.  Bake them for 15- 20 minutes depending on your oven.  They will be very soft when you first take them out, but let them cool a bit on the pan and then on a wire rack.  They should be crispy on the outside and soft on the inside.


My 11 year old just came home and tasted one.  He said it was weird but good and that he could get used to it.  We will see what the 7 year old has to say.  If he will even try it, I will be happy.  I know that my husband, Duane, will enjoy it, especially since I made them for him and his crazy diet.   My 7 year old just tried them, which is unusual.  He made a weird face and said they were cold.  He did not like them very much, but did finish eating what was in his mouth.  I expected worse, so I guess it was a success.

Well, I like them.  I hope you enjoy them too.  Let me know if you try any other varieties of flour and how it turns out.  As always, thanks for your comments.  Happy Cooking!!

Corn Chowder with Butternut Squash

It has been pretty cold the last few days and snowy too.  So I decided to make some soup before going to work on Monday.  I love my crock pot and use it a lot, especially in the winter time.  I wanted to make some Duane friendly soup, so I started looking for a bean or corn variety on Pinterest.  I remembered seeing one that looked good a while back.  Well, I could not find the one I was thinking of, but I did find an interesting corn chowder.  The recipe can be found  here, but remember, I like to change things up a bit and make them a little more Duane friendly and use what I have on hand. I will give you my recipe as we go.


This picture is of the leftovers. I was at work when Duane ate it and did not get to take the final picture in the crock pot.  It still looks tasty though.  Much better tasting than I thought it would be.  I added butternut squash instead of potatoes and I am not a big fan of squash.  The ham gives it just the right amount of flavor to make you almost forget their is even squash in it.  Although my kids loved it as babies, they won't even touch it now, but they don't like to try new things.  Someday they will learn that it's not so bad after all.


The recipe I found called for potatoes, creamed corn, canned corn, chicken broth, ham, onion, butter and cream or milk.  I had on hand cream of chicken soup, ham, onion, creamed corn, frozen corn and butternut squash.  I figured the squash was similar in texture and cooking time as potatoes and Duane can't eat potatoes but he can eat squash and likes it very much.  He will cut it in half and bake it for an hour or so and then eat it with cinnamon on it or plain.  Yuck, I can eat it that way, but do not like it much.  Something about the way it sits in my stomach, I just don't care for it that way.  But I did like it in the chowder.  It was a pretty big squash, so I only used half of it.  I cut it into halves, quarters and then eighths.  I shaved the outer layer off with my knife, very carefully, so as not to cut myself.  I like not having seeds to clean out, that is a plus with butternut squash.  Then I cut it up into about 1 inch thick chunks, so it would cook quicker.


I figured that cream of chicken was just about the same as chicken broth, butter and cream.  I did rinse the can and add the water into the mixture.  I think it worked out just fine.  You could use 2 small cans, but this is what I had on hand, so I used it.


I had some ham left over from the chicken Cordon Bleu last week.  I chopped it into about 1/2 inch or slightly larger squares.  It was pre-sliced and they were thick, so I only used 2 slices.

Chop and add the onion.  I used a nicer dicer, it works great.  If you don't have a fancy chopper or slicer, just cut it into small chunks.  I like them small, but it is up to you and how big you like them.
 Add the can of creamed corn and about 1 or 2 cups of frozen corn.  Stir it up a bit and cook on high for 4-6 hours or low for 8-10 hours.  I started on low for about 2 hours, but thought it would take too long, so I turned it up to high just before I left for work at 1:30.  Duane ate around 6, so it was on high for about 4 or 5 hours.  I left him a note to smash up the squash a little before he ate it.  He said it was a little runny, but still good.  I think if you smash them up and let it cook for another 30 minutes or so, it would thicken up more.  It was thicker the next night, when we ate leftovers.  I always like my crock pot concoctions the next day.  Something about having the flavors meld together and congeal a little more.  I think I might add a little garlic next time or some other seasonings, just to see if it will make it even better.

Chowder mixture before cooking.

It was a very yummy dinner, both times around.  That is another thing I love about making stuff in the crock pot, you can make a big batch and eat leftovers once or twice.  I hope you enjoyed the post.  If you have any suggestions or recipes to share, pleas leave a comment.  Happy Cooking!!!

Monday, March 3, 2014

Feeding the Missionaries

   In my church, The Church of Jesus Christ of Latter Day Saints, otherwise known as Mormons, we have young missionaries that share the gospel with others.  These missionaries pay for the mission themselves.  As members, we try to help them by feeding them dinner.  I have not been able to sign up to feed them in a while, so I was excited to have them over and made a really big meal.  Our ward, or congregation that meets together, has two sets of missionaries.  One set are Elders, single young men 18 or older, and one set are Sisters, single young women 19 or older.  They both came to dinner last week.  I used to have them over at least once a month, but have been busy with life and I am in the Primary at church, so I do not get as much of a chance to see the calendar and sign up.
   The Primary is what we call our young children's group.  It consists of children from 18 months to 11 years.  Once they turn 12, they go to Young Men's or Young Women's classes.  When they turn 18 they go to Priesthood for the men and Relief Society for the women.  It is a wonderful program that the Lord set up for us.  I just love it!
   Anyway, I made a big dinner and tried a few new things for Duane, my husband.  He has been on a diet that is anti sugar and amylose, which is a sugar like substance that is in a lot of root vegetables, wheat and grains, and stuff like that.  So he cannot eat potatoes, bread or any desserts.  I have made a lot of changes in my diet since I have been with Duane, but that is something I am not ready to do.  I love potatoes, I love breads and I love desserts!!  I have cut back a little on all of those, just because I think it's rude to eat them in front of him and I like to be around my husband.  He got the diet from a book called "Loose the Weight You Hate!" by Ritchie C. Shoemaker, M.D.
 
We eat a lot of salads.  This is just as American blend salad mixed with some romaine lettuce that we had in the fridge.  Nothing fancy, but tasty.  We like to put avocado oil or olive oil on our salads, instead of dressing.  Some Parmesan cheese adds a little extra flavor too.

These are some really yummy biscuits that are supposed to taste like Red Lobster's cheddar bay biscuits.  I got the recipe from a Pinterest post which you can find here.  I have adapted this recipe to what I have on hand.  I had Krusteez pancake mix instead of Bisquik biscuit mix, so I omitted the sugar and buttermilk.  I just added water as the liquid, since Krusteez is a buttermilk mix.  It tastes almost the same and is still good.


These tasty little cornbread like biscuits are my invention.  Duane can eat corn, for some reason it has a different type of sugar in it, which is ok for him to eat.  So he eats a lot of corn tortillas and corn chips instead of noodles or rolls or regular chips.  So I wanted to make something he could eat instead of the cheesy biscuits.  I started out just making them like I would regular biscuits.  I added the corn flour, some baking powder, some baking soda, some salt and water.  I did not measure, sorry, I don't like measuring unless it is a recipe that I am following for the first time.  This was just one I was making up, so I did not keep track.  I believe it was 2 cups corn flour, 1- 2 tsps. baking powder, 1 tsp baking soda, 1 tsp. salt, 1 tsp. vanilla, 2 Tbsps. powdered buttermilk, 1 cup shredded mozzarella cheese and 2 cups water.  I was trying to make it similar to the cheesy biscuit recipe, but stuff Duane could eat.  So no sugar and he can eat mozzarella cheese more so than cheddar cheese.  I added some more water until I got about the same consistency as the other recipe.  Corn flour is different from wheat flour, I have learned this by experimenting.  Almond flour, rice flour, graham flour, soy flour, whole wheat verses white flour, they all have different properties and work for some things better than others.  So just try a little hear and a little there and you will find what you like best.   

This is what the dough looked like.

 
I made some rice for everyone else, since that is what I like, besides potatoes, with my Chicken Cordon Bleu.  I just followed the cooking directions on the package of brown rice and left it in a little longer, so it got sticky, which is fine for pouring the chicken over.  I made my Chicken Cordon Bleu crock pot style.  I also found the recipe for that on Pinterest and adapted it to my needs and what I have on hand.  The recipe can be found here.  I am not sure if that was the original site I went to, but it looked like the same recipe.


My version is 6 to 8 frozen chicken breasts, 2 cans of cream of chicken soup or one family size can, rinse can and add water from can, cubed ham (about 2 cups), cubed swiss cheese (8 oz. package), salt and pepper to taste.  Sometimes I add garlic powder or onion powder to it, if I think it needs more flavor.

We had a good time and everyone liked the food.  Do you have some favorite recipes that you have adapted and would like to share?  Please leave your comments and suggestions, I can always use more ideas.  Happy Cooking!!!

Monday, February 24, 2014

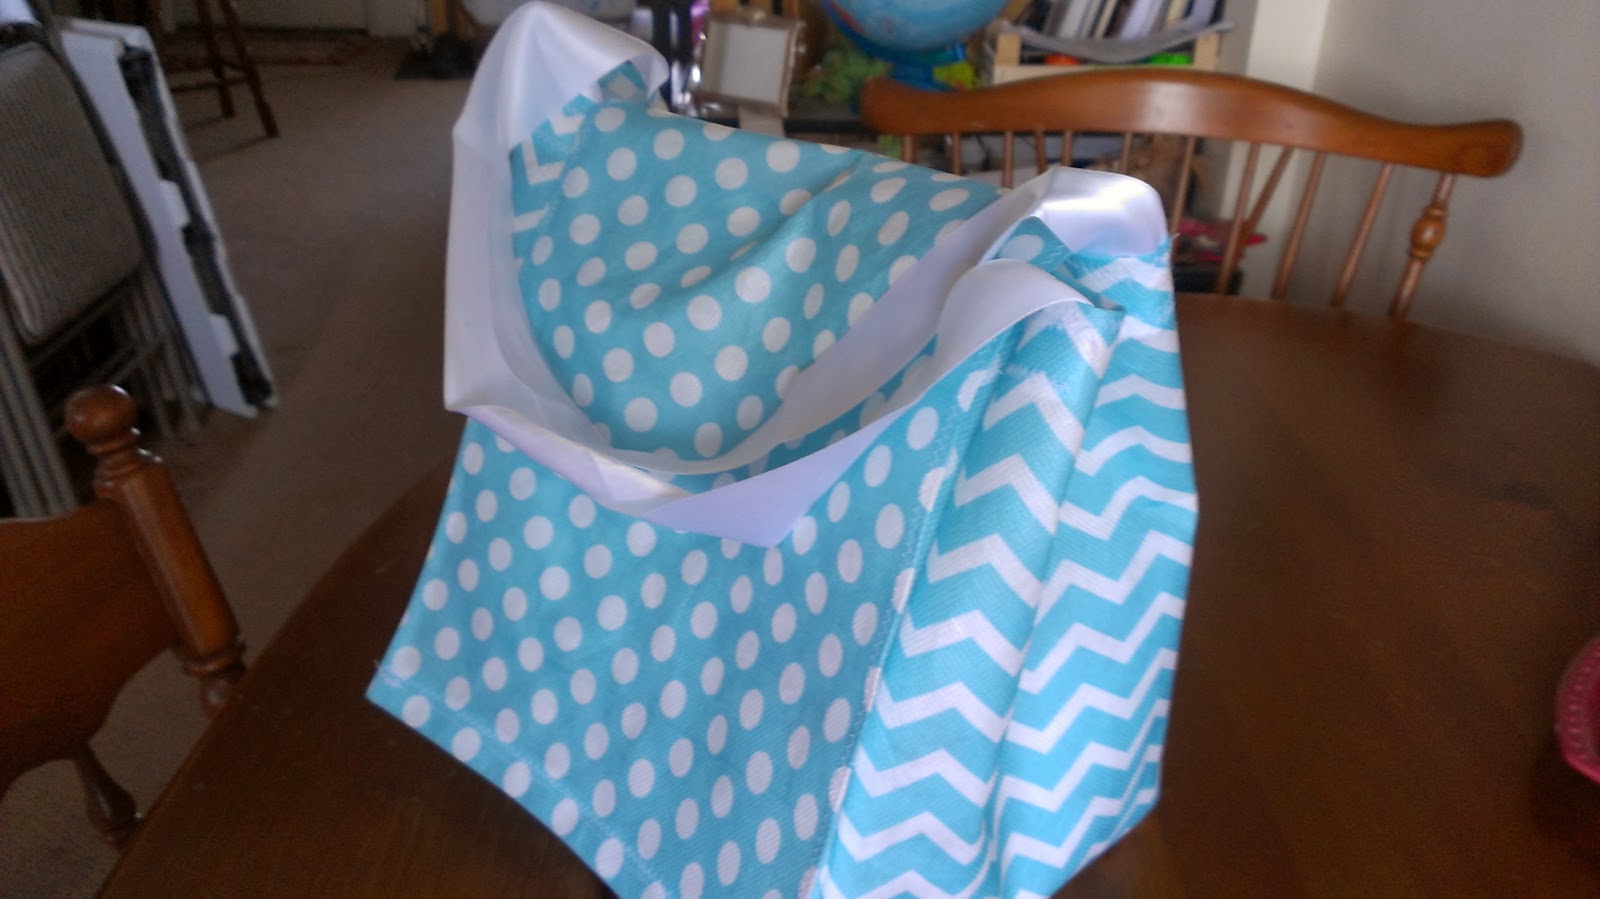
My New Lunch Bag

    I bought some of this very cute reusable bag material that we carry at JoAnn Fabric and Crafts.  I have been eyeballing it for some time now and then they got some more colors in, so I had to get it.  I love it, don't you!?


   I knew I wanted to make some shopping bags or something with it.  The lunch bag that I was taking to work was getting pretty ragged, so I decided to make a new one.  Understand that this was the first one and I really was not sure how it was going to turn out.  I had an idea in my head and hoped it would come out in the finished product.  I mixed the polka-dot with the chevron to give it more character and break up the pattern a bit.  I also used some ribbon for the handles, mainly because I had to get to work and was out of time.  Next time I will use the bag material, it will probably last longer.


   I used some cardboard pieces from paper that I had bought when I was selling Stampin' Up!  The cardboard is perfect for cutting out patterns or stabilizing things.  I also used it for the cardboard in the bottom, so that it holds it's shape better.  I love recycling, up-cycling and using things for purposes other than their intended ones.  Sometimes I feel like a hoarder, but not as bad as the ones on television.  But you know, as soon as you throw it out, you are going to need it.


   It's a little bigger than I imagined, but I think it works well.  I covered the cardboard bottom with some fabric that is in our utility section, next to the bag material.  It is used for covering the bottom of a chair or couch, under the cushions. It's the black thin fabric that cats like to shred and always gets ripped when you move.


I am totally going to make more bags and show you how, step by step.  I just need to practice a little more.  Until next time, keep crafting and doing what makes you happy.  I know I will.


Friday, February 14, 2014

Alex's Creeper Valentine Box

We made this out of boxes and duck tape.  We added buttons inside the feet to weigh it down.  I think it's pretty good.

Tuesday, February 11, 2014

The First Apron I Designed

This is a picture of the first apron that I designed on my own.  I just cut the fabric, laid it out and started sewing.  It was fun, because I had the idea in my head and just went with it.  I ended up selling it at a craft show and making a matching chef's hat for the little girl that it was going to.  I did not have a pattern for that either.

My New Work Apron

This is my new apron that I made for work.  We are able to ware our own aprons, if they are made from products we purchased from work.  I loved my old one, but it was starting to get tattered and stained.  I took what I knew I liked from it and integrated what I knew I needed into my new one.  I fell in love with this lady bug patterned fabric, that I found in our remnant bin for half price.  I knew I had to do something with it.  I decided it was perfect for a fresh new Spring look.  So I found some coordinating fabrics and a pattern that had great pockets and a nice top.  I added some ruffles, a pretty flower and a super cute lady bug and there you have it.  I love it!!!  What do you think?
This is the pattern that I used.  The one on the bottom.  As you can see, I changed it a little.

I simply cut out the top half and pockets, then added my ruffle to the bottom.  The pockets were originally one fabric, but I sewed my fabric selections together the same length as their pockets.  I was using thinner fabric, so I lined it on the under side with white cotton fabric.  I added a yo-yo style flower, layered with a smaller one and then a button, sewn on.  I drew an enlarged version of the lady bug and ironed it on with some double sided fusible webbing.  Add some fancy zig-zag and straight stitches and done. 

Does anybody know what these are for?


If you guessed making bias tape, you were right.  I used these for the bias tape on my apron and trim on the pockets.  I think it is pretty easy to us them, once you get the fabric cut unto strips and threaded through these contraptions, you just iron it into strips and sew them on.  Cheaper than buying 3 packages of pre-made double fold bias tape and you can customize your colors or patterns.  Let me know if you have any questions and I will try to answer them or do a step by step tutorial